Feed items
Nights & Weekends
11 Jun, 2006
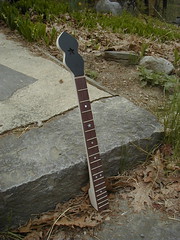
Relatively instant gratification
Originally uploaded by Usonian.
Cigar Box Guitar #1, Part I
10 Jun, 2006
Until I scrape together the cash to buy the rest of the hardware for my tenor banjo, I'm going to have a go at making a cigar box guitar. I'm making the scale a mandola-ish sort of length (17.5 inches) and giving it four strings.There are quite a few people building cigar boxes out there, and there seems to be a bit of reverse snobbery around these instruments ("All you need is a box and a plank!", "Who needs to pay hundreds of dollars for one of them Martins when you can make a cigar box guitar at home in an afternoon!" "Listen to what I can do with three strings!", et cetera.)
I can understand the appeal of throwing together a functional instrument very quickly; it feels like I've been working on my tenor banjo forever. However, I'm not particularly interested in going to the "box and plank" extreme; I want something that I'll want to look at and play for more than an hour or two once it's complete.
Cigar box instruments seem like a good niche for a novice like me:
- I can practice just about any aspect of building "real" instruments except for the body itself; neck, joints, inlay, finishing.
- If I screw up somewhere, chances are good I'll only be out a few bucks.
- Were I to start selling these things, expectations of fit and finish would be considerably lower than if I were making dreadnought clones, yet I could probably price them high enough to make a bit of profit which I could turn around and invest in tools and supplies for "real" instrument work.
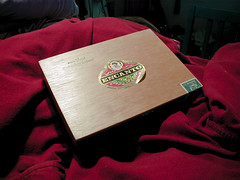
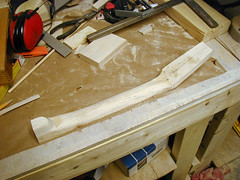
I picked up a nice sturdy, wooden Encanto cigar box last weekend, and got to work.
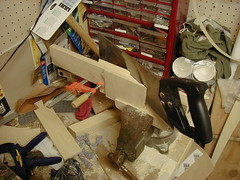
One of the first things I did was to make a miter box for cutting a low-angle scarf joint for the neck peghead joint. 15 degrees is the traditional angle, but my wooden, hand-cut miter box turned about a couple of degrees more acute than that.For an instrument like this, I'm not particularly bothered by it. It means a little bit less surface area for the joint, but it should certainly be fine for nylon strings. When I move up to guitar necks I'll invest the time and money in making a jig like the one that Kathy Matsushita uses.
The joint came out surprisingly clean despite being hand-cut with my rickety box.I did a bit of sanding and then drilled a 1/4 hole more or less perpendicular to the joint, through both pieces. I glued everything up with a piece of 1/4 dowel through the hole. I'm not sure how much extra strength it will actually add to the joint, but I know I've seen it done on a couple of lutherie pages out there.
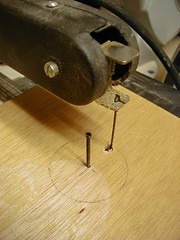
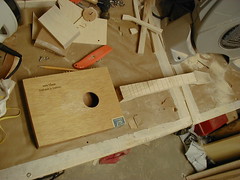
My dad will be gratified to know that I've already found a use for the old jigsaw he gave me last month. I used this saw on innumerable Cub Scout projects twenty plus years ago, and bringing it home was a bit like seeing an old friend again.To cut the soundhole I put a nail through the pivot point of the cigar box lid into a scrap of wood bolted to the jigsaw table, positioning everything so that the blade fell exactly at the outer radius of the circle from the pivot.
I also drilled a small hole in the lid ahead of time to let the blade through.
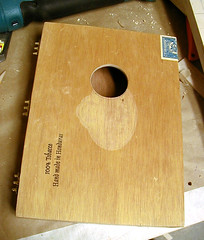
Both of my soprano ukes' soundholes are 1.75 inches in diameter, so I decided to start there. I haven't decided whether it looks a tad too small or not.There is quite a lot of information out there about the physics of soundholes and soundboxes, but not being a physicist a lot of it is over my head (not to mention overkill for a cigar box.) One thing I took away from what little reading I did is that too large of a soundhole relative to the size of the air chamber means poor response from the instrument top. Since you can always take more wood off, but you can never put it back on, 1.75 inches it is.
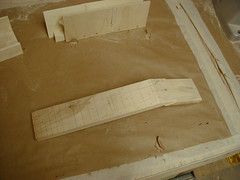
After the neck joint dried I cut the fret slots. I'm not using a fingerboard for this instrument, so I cut the slots before profiling the neck; much easier to make perpendicular cuts that way. It would have been even easier if I had cut the slots before gluing the peghead joint; that way the neck would have sat flat in the miter box.
After gluing on another small block of wood at the heel, and putting a maple veneer on the peghead to cover up the scarf joint, I went ahead and trimmed the neck profile and peghead outline.
Compared to the stop-and-start progress on my still-incomplete tenor banjo, this thing is coming together lightning fast. This is at how things looked after two sessions in the workshop.
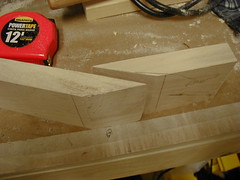
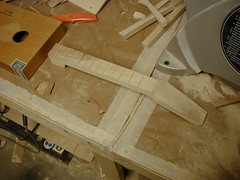
After a busy week I was eager to get back to this project in hopes of getting it strung this weekend. Maybe a little too eager; I tried using the bandsaw at an angle to rough out angles along the neck that will eventually be curves, and trimmed a little more away than I really wanted.The thing I need to keep reminding myself is that I've already spent considerably more time on this thing than many people would, and that the neck will be perfectly functional despite being a little bit uneven in those spots.
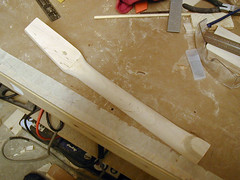 Sanding has gone fairly quickly, although there's a stubborn spot of glue down at the heel block, and as always there are a few bandsaw nicks that may be deep enough to require filler, rather than sanding down everything around them. I need to get a bandsaw blade with a closer set.
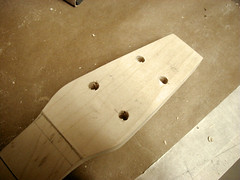
Finally, I drilled holes in the peghead for the 1/4 posts of the guitar-type tuners I'll be using for the instrument. I might actually have this thing fretted and strung by the end of my next session in the workshop!
Come In
24 May, 2006
There's a very vocal thrush in the woods tonight. I was tempted to go sit on the porch in the gloaming and listen, but when I muted the Red Sox-Yankees game, the thrush stopped singing. Maybe it knew that Tice and Zinny are nestled companionably on either side of me, and didn't want us to get up.
I am put in mind of Robert Frost's Come In.
Tagged:
5 Minute Juggling Balls
17 May, 2006
I have been wanting a set of juggling balls for quite some time now, but I've always been loathe to shell out for them and I haven't wanted to invest the time to make a nice set out of leather, so this clever idea was absolutely perfect for me:
http://www.abc.net.au/science/surfingscientist/jugglingballs.htm
They did indeed take about 5 minutes to make; it took me longer to find the balloons than it did to fill then. I used popcorn instead of rice, so they're a little bit bumpy. I'm tempted to make another set using sand, although they might turn out a bit heavy for their size.
Haste Makes Waste
16 May, 2006
When in Northampton, do buy a cup of coffee from Haymarket, or Shelburne Falls Coffee Roasters, or even Starbucks, even if it means you have to spend an extra ten minutes crossing main street.
Don't buy coffee from the sandwich stand on the street level of Thorne's Marketplace. I can't remember the last time I had such a lousy cup of coffee, and paid that much for it. I feel guilty, like I cheated on Haymarket.
Free NNTP Servers
10 May, 2006
Maybe this is a new thing, or maybe I never looked in the right place before, but a Google search for "Free NNTP Server" gives you all kinds of results. It led me to freetext.usenetserver.com, which carries all of the groups I lurk in.
Why not just use Google Groups? I don't like the interface very much except for archive searches.
Now if I can just find a good OS X NNTP client....
Shop Apron Lament
7 May, 2006
When I was working as an all-purpose special effects shop monkey in 1997, some guy came through the industrial park where I worked selling denim shop aprons for five bucks apiece. Unlike most of the peddlers that made the rounds periodically, this one had a useful product at a good price, and he sold quite a few aprons to us that afternoon.
Mine was quickly besmirched with paint, bondo, resin, cyanoacrylate, and all manner of other unhealthy substances. I probably could have pointed to each stain and told you which project it had come from.
Tenor #1: Neck, Part XI
7 May, 2006
In the end I decided to take a bit more wood off the neck behind the first several frets. Not a lot, but enough to feel perceptibly more slim.
Tenor #1: Neck, Part X
1 May, 2006
After gluing on the fingerboard, there were a couple of spots where saw marks in the neck were deeper than the edge of the fingerboard. Without doing any research on the preferred filler material for luthiers, I picked up a small tube of DAP Plastic Wood, which filled the space nicely. It's quite obvious, but it's on the side of the neck that will be facing the ground, and with the mahogany stain I also picked up over the weekend it should be fairly inoffensive when all is said and done.
Popular
Recently Perused
- No offense to random strangers who email me, but no I don't have "5 minutes" to provide you with free #Drupal phone tech support. #fb — 6 years 40 weeks ago
- Totally blown away by the speed with which Git just pushed data for 7000+ files to a remote master. #fb — 6 years 40 weeks ago
- lolmanny #fb — 6 years 40 weeks ago
- I just ousted @codeslave as the mayor of Hungry 4 Pizza on @foursquare! http://4sq.com/ba7hBm — 6 years 40 weeks ago
- Awww yeah http://flic.kr/p/8c3Xbs — 6 years 41 weeks ago