April 2006
Tenor #1: Neck, Part IX
23 Apr, 2006
Once again I followed Siminoff's technique for attaching the fingerboard, by using two small nails as positioning pins to hold the fingerboard in place during clamping.
I think everything went well... now it's a matter of sanding, then sanding, then sanding some more.
Hairless Monkeys
21 Apr, 2006
To quote a friend's recent weblog entry,
"Humans are animals."
This was not said in, nor am I quoting it in, a breathless, moralistic context... I'm just an observer who's spent more of my life watching people's little social games than participating in them.
The other day, I was in downtown Northampton. At the main intersection they have replaced all of the pedestrian walk signal buttons with these optical doodads that you trip with your thumb instead of pushing a button. (Clever; nothing mechanical to wear out after getting pushed hundreds of times a day.)
It so happens that when you trigger this optical sensor, the device also emits an electronic chirp... presumably to let blind people know they hit it.
A group of three teenage boys reached the intersection, and when that thing chirped it totally blew their minds. They each had to make the thing chirp several times, and one of them decided that it would be really cool if he stood there and pushed that button over and over and over and over and over. Then he discovered that he could do it even faster if he used his elbow. He would have kept going if a woman hadn't stuck her head out of Sweeties and told him to cut it out.
Ten minutes later when I was ready to cross the intersection in the other direction, I watched a group of three teenage girls doing pretty much the same thing.
Then as I drove back to the office I watched a Very Important Monkey as she drove through the stop sign at the three way, no-light intersection near the industrial park without so much as slowing down. I would say people do that about 20% of the time at that intersection. Another 50% slow down without stopping, and I'm among the 30% who think that the big red STOP sign is more of an imperative than a vague suggestion for other people.
Like my friend, I am also quick to admit that I'm sure I exhibit plenty of monkey behavior too; I'm not claiming superiority over anyone. I don't know if I even have a point, other than that people are monkeys.
Also
- Login to post comments
Tenor #1: Neck, Part VIII
20 Apr, 2006
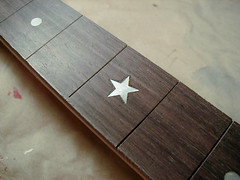
While playing my 5-string banjo last night I noticed that the last inlay marker before the twelfth fret is at the tenth fret, not the ninth as I placed it on my fretboard. A Google Image search confirmed that the 10th fret is the typical place to put it.
It's a good thing I'm not planning on selling this particular instrument when it's finished. It's a detail that will always bug me a little bit, but not quite enough to throw out the fingerboard.
Postscript
While playing guitar tonight I noticed that the marker is indeed on the ninth fret. Interesting. I'll have to cross-reference tenor guitars and mandolins too.
Tenor #1: Neck, Part VII
19 Apr, 2006

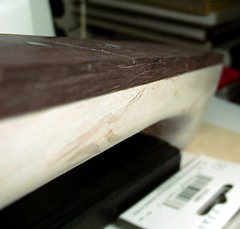
Although I saved about thirteen bucks by buying a rosewood guitar fretboard blank, I didn't appreciate how thick 1/4" would look on the relatively skinny tenor banjo neck. Next time I'll either spring for the 3/16" ebony from Stewmac, or see if I can find a 3/16" rosewood blank elsewhere.
Because the fingerboard is so thick, I decided to take a fair amount of additional wood off of the neck.
The nice thing about my shureform is that it removes wood quickly. The dangerous thing about my shureform is that it removes wood quickly.
Finally, I reached the point where it seemed like I really need the fingerboard in place before final shaping and sanding, so I took the plunge and cut the fingerboard to shape.
It looks like this will actually be an 18-fret tenor when all is said and done; my original calculations for the neck length were based on the position of the bridge on the 10 inch pot. It didn't occur to me to check the fret placement at that point, so it wasn't until I trimmed the fingerboard to size that I realized that there is just barely too little room for fret 19.
I'm not particularly upset... If I ever get proficient enough on tenor banjo that I actually need one with 19 frets, I will probably be happy to buy (or make) one.
Gluing the fingerboard on will be the scariest part of the operation so far. If the frets aren't absolutely perpendicular to the axis of the neck, playability will be seriously impaired.
For tonight, I will just bask in the satisfaction of how good the fretboard looks resting on the neck.
Also
- Login to post comments
Tenor #1: Neck, Part VI
19 Apr, 2006
After gluing the inlay in place and patching the space with a mix of glue and rosewood dust, it was time to sand everything flush.
I started with 100 grit paper to get the worst of the excess glue off of the surface, then went to 150, 220, and finally down to steel wool.
It came out great, and I can't wait to do more on future instruments.
Also
- Login to post comments
Arithmetic and Velocity Templates
18 Apr, 2006
This is mentioned in the Velocity User Guide, but not very explicitly: If you need to perform an arithmetic operation on a Velocity variable, that variable must have been created as an integer.
What this means if you're passing a HashMap of parameters to the Velocity engine is that you need to pass in an instance of the Integer class. Otherwise, the expression will evaluate to null and the variable will remain unchanged. (So if you pass the String "1" into velocity and then try to increment it in a loop, it will never change.)
Also
- Login to post comments
Tenor #1: Neck, Part V
17 Apr, 2006
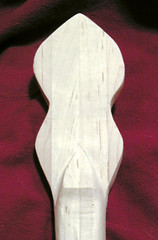
I spent about an hour cleaning up the peghead tonight. I got the volute more or less under control, and my 1/4-sheet sander has gotten most of the bandsaw marks off of the back of the peghead (although it is by no means flat yet.)
Next time I'll decide definitively what kind of overlay I'm using before cutting out the neck, and I'll know the final thickness ahead of time.
The curve is not symmetrical, but it's not so far out of whack as to drive me crazy. The more I look at this photo, the more I can see I'll want to smooth out the curve on the left. I just need to make sure I don't get into the "little bit off on this side, little bit off on that side" game trying to even things up.
Also
- Login to post comments
Time
16 Apr, 2006
 If I had to guess how much time I've put into this tenor banjo, it would not actually be very much compared to the number of weeks that have passed... maybe 15 hours altogether. Today was the first time in about a month that I've managed to find a number of consecutive hours to work on it, and I got a tremendous amount done.
Also
- Login to post comments
Tenor #1: Neck, Part IV
16 Apr, 2006
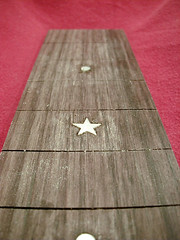 I finally summoned the courage to cut into my pristine piece of rosewood. I built a small miter box last month, and it seems to have worked fairly well. I'll know better when the time comes to actually install the frets.
Eventually I expect I will invest in Stewart MacDonald's fret slotting saw. I love my Vaughn bear saw, but it didn't feel entirely rigid - and this is an operation where rigidity is definitely a plus.
Once the fret slots were cut, I decided to go ahead with the pre-cut inlays. Taking another tip from Siminoff's book I went with the white tempera technique, painting over the areas to be inlaid and then blacking in the areas to be cut out; with all the sawdust that will be created, the white makes it easier to see where you've already cut. When you're done, the tempera washes right off.
Routing the inlay chambers was wonderfully easy with the Dremel router attachment. For the points of the star I used a tiny engraving bit I purchased a couple of months ago - so small I had to purchase an additional 3/32" chuck for it. It's exciting to see how easy cutting the cavities was. When I get some mother of pearl blanks to play with, I'll probably find that cutting the stuff out is the trickier part.
Also
- Login to post comments
Tenor #1: Rim, Part III
16 Apr, 2006
 In the end I decided to use the full 2 inch width of veneer. In an attempt to avoid ironing directly against the edge of the drumhead, I first tried ironing the veneer agains a length of parchment paper. My theory was that the glue would melt without sticking, and I would be able to peel it up and apply it directly to the drum.
That might have worked if I had planned to apply the veneer in two lengths, but on my first try I went for the full 31.42 inch length. (Hey high school geometry slackers: ? × the 10" diameter of the drum rounds up to 31.42 inches. Yes, you will use this stuff in real life.)
31 inches proved to be too long to manage with the parchment paper technique; the glue wouldn't have stayed hot long enough to iron the whole length at once, and there was no good way to apply it gradually. In the end I decided to iron directly against the outside of the drum, avoiding the staples and head material at the top 1/4 inch.
The only problem there was that the presence of the staples made the veneer want to go on in a very gradual spiral, since the surface wasn't perfectly flat. By the time I got halfway around the circumference of the drum, the edges were out of whack. I wound up cutting the veneer in half, so there will be two seams: one where the neck attaches, and one where the tailpiece attaches. Even so, the veneer didn't go on as smoothly as I would have liked. There are a few uneven spots where I'll have to go back and try and re-iron and smooth it down, but I don't know how well that will work.
Also
- Login to post comments
Tenor #1: Neck, Part III
16 Apr, 2006
 I had done a fair amount of shaping on the neck since the last photo, and I decided it was time to shape the peghead before continuing.
Taking a tip from Siminoff's book, I positioned the veneer and then drilled two small pilot holes outside of the "live" peghead area; after gluing the peghead, two nails in the pilot holes kept it from shifting when I applied clamps.
My little 9" benchtop bandsaw does a surprisingly capable job during shaping; I used a jig to hold the peghead at its 15 degree angle to the blade, and because I went with a simple peghead shape the cutting went quickly and without incident. More and more I find myself using the running blade to scrape small amounts of wood away laterally to smooth rough spots... eventually I'll need to experiment with a finer blade.
I was also able to thin the overall peghead thickness much closer to the final target of 9/16ths of an inch. My hand-cut overlay is not very graceful.
Also
- Login to post comments
Odder Jobs
16 Apr, 2006
My friend Charlie appears in Nancy Rica Shiff's Odder Jobs, a collection of photographs of unusual occupations. Charlie plays the Theremin:

Photograph is © Nancy Rica ShiffI was lucky enough to see Charlie perform a few times before moving away from Los Angeles... he is one of the best! Theremin has been on my list of instruments to try someday for almost as long as banjo... in fact, for a while I expected I'd buy a Theremin first. There is still a MoogMusic Etherwave Kit out there with my name on it.
Tagged:
Also
- Login to post comments
Am I missing something?
12 Apr, 2006
"Congratulations! You have to pay $200 a month for healthcare whether you can afford it or not. This is truly a historic day!"
Also
- Login to post comments
Soon.
11 Apr, 2006

Porch Picking
Originally uploaded by Usonian.
It was mild enough this weekend to reclaim the porch, somewhat.
Not quite mild enough to get any picking done, though.
Tagged:
Also
- Login to post comments
Django in June
11 Apr, 2006
I helped my friend Andrew Lawrence with the web site for the Django in June festival, happening in Northampton, Massachusetts from June 16-18, 2006.
Tagged:
Also
- Login to post comments
A Two-Pronged Approach
10 Apr, 2006
Well, for all of my bluster a week and a half ago, I haven't really gotten on track with my three-finger banjo practice. I've been playing almost every day, but still in a fairly unfocused manner.
I first went back to the Scruggs book, thinking I'd work my way through exercise by exercise, learning The Official Way To Play Banjo so I'll have a good foundation wherever I go next. There are some good exercises building up to the arrangement of Cripple Creek from Flatt & Scruggs' Foggy Mountain Banjo album, but as Steve Martin will tell you, you reach a point where you really don't want to play Cripple Creek any more. It was the first song I learned in the clawhammer style four years ago, and one of the first I learned in the Scruggs style two years ago. I'm kind of tired of playing it, especially knowing that even if I work on it until I can play the Scruggs breaks impeccably, anyone else I play with is going to be sick of that song, too.
Last week I got an arrangement of 8th of January for my guitar class, a tune that burrowed its way deep into my head and demanded to be practiced on guitar, sapping some of my banjo energy. However, I got to tinkering one night last week and put together a surprisingly easy melodic-style arrangement of the tune for 5-String banjo, in open C tuning capoed up two frets (aDAC#E.) (Side note: Tabledit is an invaluable tool for this.)
The thing I find with melodic arrangements on banjo is that they are intellectually cool, but they just feel like the most ass-backwards way to go about playing a melody on a stringed instrument; when playing an instrument with a flat pick the progression is clear: play up the frets for one position, then move up to the next string, repeat. When playing melodic-style on banjo, you're often doing things like playing an open, higher string then playing a lower string fretted up at the 5th or 7th fret, then jumping up two strings and doing the same thing. This lets the melody ring smoothly while picking with three fingers, and once you get it down the notes fall into the right place but it's incredibly difficult to "feel" what the next note is when it's 7 frets away on a different string.
Single-string, or Don Reno style is a little bit better, but picking down with the thumb and up with the index finger feels silly and unnatural... especially when you know how natural it feels to play the same type of passage with a flat pick.
For example, here is the tablature for a G scale as you would play it single-string style:
D|----------------0---2---4---5---|4---2---0-----------------------|

B|--------0---1-------------------|------------1---0---------------|

G|0---2---------------------------|--------------------2---0-------|

D|--------------------------------|--------------------------------|

g|--------------------------------|--------------------------------|
Even if you don't play a stringed instrument, the progession is visually clear. Here's the same exact scale in the melodic style:
D|----------------0-------4-------|4-------0-----------------------|

B|--------0-----------5-----------|----5-----------0---------------|

G|0-----------5-------------------|------------5-----------0-------|

D|----7---------------------------|--------------------7-----------|

g|----------------------------0---|--------------------------------|
In both cases, it seems like you're making extra work for yourself. I know the reason behind both styles is that it still leaves you with the ability to play the three-finger rolls and pinches that make Scruggs style banjo so distinctive, but it's hard to get a feel for it.
I was fooling around with some basic G major and G major pentatonic scales in both Reno and melodic styles tonight, and realized that much of my frustration lies with the fact that you can memorize how to play a scale, but not really know what you're playing; carefully arranged melodic passages fall apart if you miss a note or a beat, and unless you really know the scale and its relationship to the fretboard you don't have a hope of getting back on track if you flub it.
And needless to say, knowing the theory behind scale construction and knowing the fretboard is absolutely essential to improvisation.
So to become a well-rounded three-finger style banjo player I need to work on technique, (which will hopefully be a byproduct of rote repetition) and I need to really learn my instrument, not just how to memorize songs on it.
This is not a really a new revelation; I've had my copy of Edly's Music Theory for Practical People for two years now, and I have gleaned a lot from it in terms of calculating the I-IV-V chords of a particular key in my head on the fly, transposing tunes, building scales and chords, et cetera... but I've used the book more like a reference than a study. I need to know these things cold without consulting a book, and I need to know how they map to the banjo fretboard, forward and backward with my eyes closed.
I should probably also stop putting it off and learn to read standard musical notation. This is not exactly fun stuff, but if nothing else it is the sort of stuff that makes it easy to mark progress.
Remember Me?
7 Apr, 2006
A humble suggestion to the developers of pretty much every damn web application I've ever used:
If you're going to include a "Remember Me" checkbox next to the login screen, make it actually remember me. If you're not going to do that, then leave it off altogether, or at least qualify it to read, "Remember Me for 15 minutes, after which I'll have to log in again anyway."
Flickr gets it right.
Tagged:
Also
- Login to post comments

Also
- Login to post comments
It was only a matter of time...
5 Apr, 2006
So I signed up for a MySpace account, which can be found at
http://myspace.com/chaseinstruments
I don't spend a lot of time there, but plenty of other people do. MySpace seems to have become the lingua franca for musicians showcasing their music online. The animated banner ads and excruciatingly slow response over dial-up makes me want to gouge my eyes out, but there is definitely something to be said for being able to say
"Listen to my stuff at myspace.com/chaseinstruments"
instead of
"go to my web site, then click on 'Music', then right click on a file and choose 'Save As...', then open it up in an MP3 player like Winamp or iTunes."
I put up a recording of Mississippi Sawyer that I made earlier this evening. A few flubs, but nothing too excruciating.
Of course, if you'd rather not deal with the ads, flash-based MP3 player, and crappy navigation on MySpace, you can download it the old fashioned way:
Tagged:
Also
- Login to post comments
working copy path ‘foo’ does not exist in repository.
3 Apr, 2006
Once in a while Subversion will come back at you with a strange error like the "working copy path does not exist in repository" one I was just stuck on for half an hour.
In most cases, this one included, the problem can be alleviated by wiping out the offending directory in your working copy and re-updating. Of course, if you've got changes you're trying to commit you'll want to back those up somewhere so you can re-edit the file(s) in question once you check them back out.
One instance of this problem mentioned that it was also necessary to rename the offending file, commit the change, then rename it back, but so far I haven't needed to do that.
Tagged:
Also
- Login to post comments
Popular
Recently Perused
- I just ousted Debra B. as the mayor of Beals Memorial Library on @foursquare! http://t.co/mmjdzwnB — 7 years 25 weeks ago
- I just unlocked the "Bookworm" badge on @foursquare for checking in at bookstores and libraries! Long live print! http://t.co/uKVSL8pr — 7 years 25 weeks ago
- I just ousted @mlb61 as the mayor of Murdock Dairy Farm on @foursquare! http://t.co/sMd7Pu14 — 7 years 25 weeks ago
- I just unlocked the Back to School badge on @foursquare for checking in back on campus! Time to party! Er, study. http://t.co/W1uUDXTc — 7 years 26 weeks ago
- I just ousted Sean W. as the mayor of Athol Masonic Temple on @foursquare! http://t.co/tPzM2R9P — 7 years 28 weeks ago
- 1 of 84
- ››